RabbitMQ delayed-messaging without a plugin (implement in python)
We usually use RabbitMQ Delayed Message Plugin to add delayed-messaging (or scheduled-messaging) to RabbitMQ.
The problem is that, sometimes we cannot use a plugin. For example, some RabbitMQ services hosted on the cloud (SaaS RabbitMQ) do not support additional plugins.
In this article, I will show you how to implement a native exchange that supports delayed-messaging. The example code is written in python.
General idea
The traditional message flow with the help of RabbitMQ Delayed Message Plugin

Note that x-delayed-message is a third-party exchange type introduced by RabbitMQ Delayed Message Plugin.
[message with x-delay header]

↓ publish to

[delay-exchange of type x-delayed-message]

↓ delay according to message's x-delay header

delay for x-delay milliseconds

↓ route to

[queues bound to delay-exchange]
With the plugin, the exchange of type x-delayed-message can both delay messages and route messages.
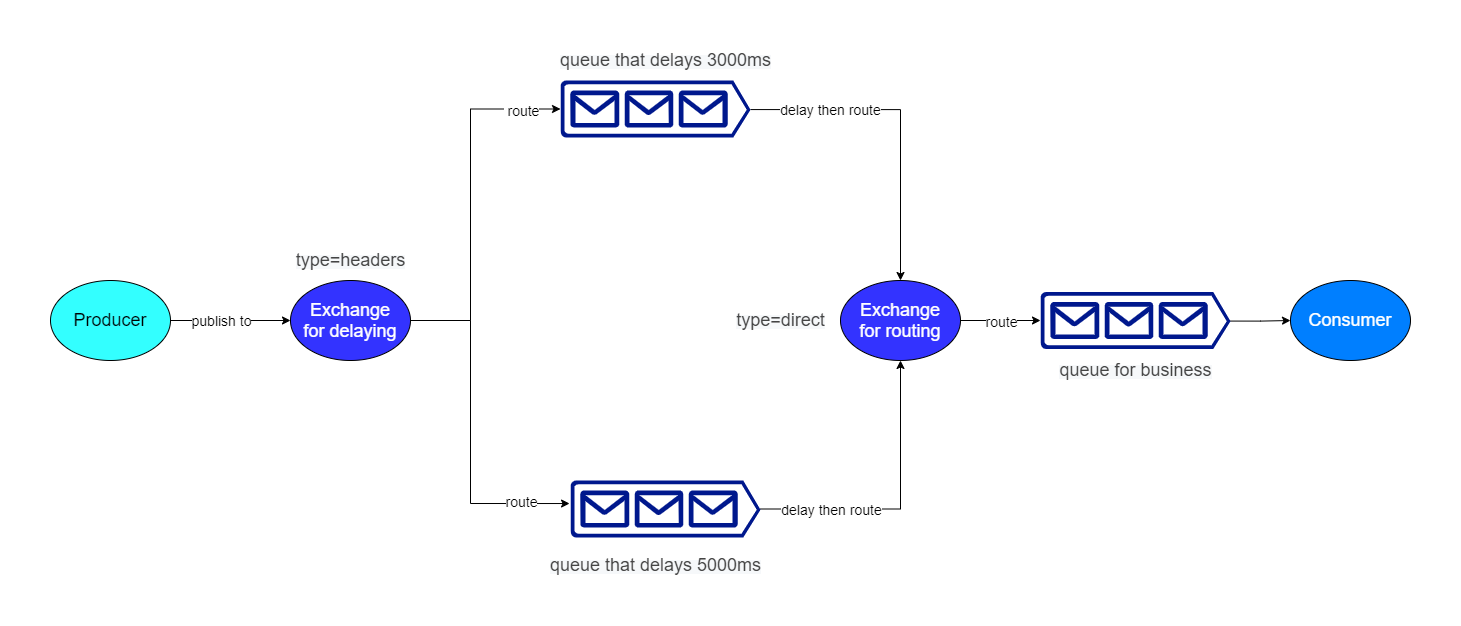
The new message flow without a plugin

Without the plugin, we cannot delay messages and route messages with only one exchange. We have to use two exchanges.
- The first one is a delay-exchange that delays messages.
- The sencond one is a normal exchange that routes messages.
[message with new-delay header]  Note: use new-delay rather than the plugin's x-delay

↓ publish to

[native delay-exchange of type headers]

↓ route according to message's new-delay header

[delay-queues bound to delay-exchange] Note: one queue corresponds to one new-delay

↓ delay

delay for new-delay milliseconds

↓ route to

[normal exchange]

↓ route to

[queues bound to the normal exchange]
Notice [delay-queues bound to delay-exchange], these queues are the key to implementing delaying. We set two special arguments on these queues:
x-message-ttl: milliseconds of messages' living time. For example, ifx-message-ttlequals to 5000, then a message in this queue will be dead after 5000ms since the time it is pushed to this queue.x-dead-letter-exchange: When a message is dead, they are routed to the exchange specified byx-dead-letter-exchange.
Example code
Before we write the code, install related python library:
pip install pika
Here's the code to implement delayed-messaging without a plugin:
import time
import pika

connection = pika.BlockingConnection(pika.ConnectionParameters('localhost'))
channel = connection.channel()

# declare normal queue and exchange
test_queue = 'test-queue'
normal_exchange = 'normal-exchange'
channel.exchange_declare(exchange=normal_exchange)
channel.queue_declare(test_queue)
channel.queue_bind(queue=test_queue, exchange=normal_exchange, routing_key=test_queue)

# exchange for delaying messages
delay_exchange = 'delay-exchange'
channel.exchange_declare(exchange=delay_exchange, exchange_type='headers')

# generate queues for delaying messages. one queue for one delaying time.
def declare_delay_queue(milliseconds):
    delay_queue = 'delay-queue-%s' % milliseconds
    # messages in delay_queue will live for x-message-ttl ms and then routed to x-dead-letter-exchange
    channel.queue_declare(delay_queue, arguments={
        'x-dead-letter-exchange': normal_exchange,
        'x-message-ttl': milliseconds
    })
    # messages sent to delay_exchange will be routed to the target delay_queue according to new-delay header
    channel.queue_bind(queue=delay_queue, exchange=delay_exchange, arguments={'new-delay': milliseconds})

# messages in this queue will be delayed for 3000 ms (3 seconds)
declare_delay_queue(3000)
# messages in this queue will be delayed for 5000 ms (5 seconds)
declare_delay_queue(5000)

# publish a normal message with no delay
channel.basic_publish(
    exchange=normal_exchange, routing_key=test_queue, body='msg-no-delay'
)

# publish a message that delays for 3000 ms
channel.basic_publish(
    exchange=delay_exchange, routing_key=test_queue, body='msg-delay-3s',
    properties=pika.BasicProperties(headers={'new-delay': 3000})
)

# publish a message that delays for 5000 ms
channel.basic_publish(
    exchange=delay_exchange, routing_key=test_queue, body='msg-delay-5s',
    properties=pika.BasicProperties(headers={'new-delay': 5000})
)

start_time = int(time.time())
# when a message is received, print the elapsed seconds and message body
def msg_callback(channel, method, properties, body):
    elapsed_seconds = int(time.time()) - start_time
    print(elapsed_seconds, body)
    channel.basic_ack(delivery_tag=method.delivery_tag)


channel.basic_consume(queue=test_queue, on_message_callback=msg_callback)
channel.start_consuming()
Execute the code above, and we'll get the printed output:
0 b'msg-no-delay'
3 b'msg-delay-3s'
5 b'msg-delay-5s'
The code works fine, as messages are printed after expected seconds.